13 minutes
Unity CLI and GitHub Actions: Run Edit Mode Tests on Every Push
Unity automation used to feel heavier than it should have for small game projects.
I do not mean “large studio build farm” automation. That is always going to have some weight behind it. I mean the first boring step: push a commit, run a few Edit Mode tests, keep the result somewhere visible, and stop letting broken utility code drift into the main branch unnoticed.
That first step should be cheap. It should be understandable. It should not require a whole DevOps personality transplant.
The Unity CLI makes that starter version much easier to justify. It gives us one command-line surface for project creation, editor installation, test execution, and eventually builds. GitHub Actions gives us a hosted runner, repository secrets, and artifact upload. Put those together and we get a small but useful CI loop: every push or pull request runs Unity tests without someone opening the editor by hand.
This post walks through that loop as a mini tutorial. I am not trying to build the perfect production pipeline. I want to get a real Unity project running a real Edit Mode test locally and in GitHub Actions, with code samples that are small enough to copy into a fresh repository.
The smallest useful CI loop
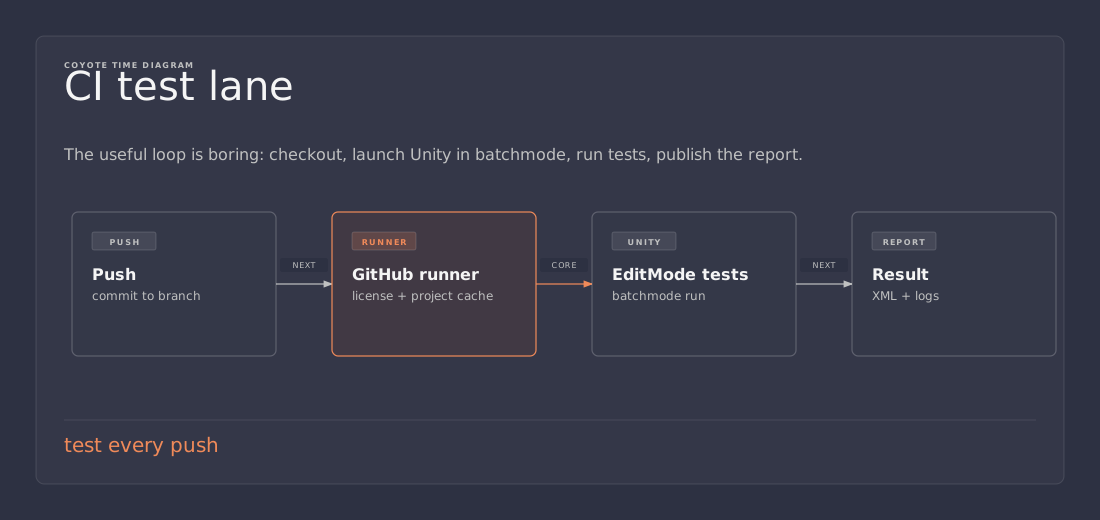
A good first Unity CI pipeline has four jobs, even if they all live in one GitHub Actions job at the start:
- install the Unity CLI
- install or locate the editor version the project expects
- activate a Unity license for the runner
- run tests and upload the results
That is enough to catch a surprising amount of damage. Edit Mode tests are especially good as a first target because they do not need a running scene, a graphics device, or a full player build. They are perfect for pure gameplay rules, data transforms, save/load helpers, stat formulas, targeting logic, validation code, inventory constraints, and the boring glue that quietly breaks when nobody is looking.
The lazy version is not to automate every possible thing immediately. The lazy version is to automate the cheapest check that would have caught yesterday’s mistake.
For most Unity projects, that is an Edit Mode smoke test.
Step 1: install the Unity CLI
Start by installing the Unity CLI using the command from Unity’s documentation for your operating system. The installer command changes by platform, so I avoid hardcoding it into project docs. Link the team to the official install page, then commit the commands you actually depend on after the CLI is installed.
Once it is available, check the version:
unity --version
Then ask the tool what it can do:
unity --help
unity test --help
unity editors --help
unity projects --help
That habit matters. CLI tools grow. Flags move. Defaults change. A blog post or an old wiki page can get stale, but --help tells you what the installed version understands right now.
For the rest of this tutorial, assume the project wants one explicit editor version:
export UNITY_VERSION="6000.0.0f1" # replace with the version your project uses
Do not let CI “use whatever is latest.” That is how a routine package update turns into a mystery failure. Pick an editor version, put it in one place, and update it deliberately.
Step 2: create or open a project from the command line
If you are starting from scratch, the project creation flow is roughly this shape:
unity templates list --editor-version "$UNITY_VERSION"

unity projects create \
  --name CliCiSample \
  --path . \
  --editor-version "$UNITY_VERSION" \
  --template com.unity.template.urp-blank
Template identifiers vary, so list them first instead of guessing. For an existing project, skip creation and run commands from the repository root.
If you want the project visible in Unity Hub, add it explicitly:
unity projects add --path "$(pwd)/CliCiSample"
You can also open a project from the CLI:
unity projects open --path "$(pwd)/CliCiSample"
This is a small workflow improvement, but it also sets the tone for the pipeline. If a developer can run something locally from the terminal, CI can usually run the same thing in the cloud. If a step only exists as “click around in the editor until it works,” it is not automation yet.
Step 3: add one deliberately boring Edit Mode test
The first test should not be clever. Clever first tests usually turn into framework debugging. Start with a tiny smoke test that proves the test assembly is wired correctly.
Create this folder structure under Assets:
Assets/
  Tests/
    EditMode/
      Game.EditMode.Tests.asmdef
      SmokeTests.cs
The assembly definition can be minimal:
{
  "name": "Game.EditMode.Tests",
  "rootNamespace": "Game.Tests",
  "references": [
    "UnityEngine.TestRunner",
    "UnityEditor.TestRunner"
  ],
  "includePlatforms": [
    "Editor"
  ],
  "excludePlatforms": [],
  "allowUnsafeCode": false,
  "overrideReferences": false,
  "precompiledReferences": [],
  "autoReferenced": true,
  "defineConstraints": [],
  "versionDefines": [],
  "noEngineReferences": false
}
Then add the least exciting test possible:
using NUnit.Framework;

namespace Game.Tests
{
    public sealed class SmokeTests
    {
        [Test]
        public void Arithmetic_still_works()
        {
            Assert.AreEqual(2, 1 + 1);
        }
    }
}
Yes, it is silly. That is why I like it.
This test is not meant to validate gameplay. It validates plumbing: the test assembly compiles, NUnit is available, the editor can load the project, and the CLI can execute Edit Mode tests. Once that works, replace the silly assertion with something useful.
For example, a real first gameplay test might check a pure formula:
using NUnit.Framework;

namespace Game.Tests
{
    public static class DamageFormula
    {
        public static int ApplyArmor(int rawDamage, int armor)
        {
            return System.Math.Max(1, rawDamage - armor);
        }
    }

    public sealed class DamageFormulaTests
    {
        [Test]
        public void Armor_reduces_damage_but_never_below_one()
        {
            Assert.AreEqual(7, DamageFormula.ApplyArmor(rawDamage: 10, armor: 3));
            Assert.AreEqual(1, DamageFormula.ApplyArmor(rawDamage: 10, armor: 50));
        }
    }
}
That is the kind of code Edit Mode tests are great at protecting. No scene. No prefab. No timing. Just a rule that should stay true.
Step 4: run the tests locally with the same shape CI will use
From the project root, run the tests through the Unity CLI:
unity test \
  --project-path . \
  --editor-version "$UNITY_VERSION" \
  --test-platform editmode \
  --results-path test-results.xml \
  --allow-install \
  --timeout 600
A few flags are doing useful work here.
--project-path . makes the current directory the project. That is what the GitHub runner will do after checking out the repository.
--editor-version "$UNITY_VERSION" keeps local and cloud behavior pinned to the same editor family.
--test-platform editmode keeps this first job focused. Play Mode tests and builds can come later.
--results-path test-results.xml writes a file that CI can upload as an artifact.
--allow-install is convenient on fresh machines because the CLI can install the requested editor if it is missing. Whether you want that in production CI depends on how much control you want over cold-start time. For a starter pipeline, it is acceptable. For a mature pipeline, caching and pre-baked runners may be better.
--timeout 600 keeps a wedged test run from consuming the runner forever. Ten minutes is generous for a tiny Edit Mode suite, but it is a sane first guardrail.
Add the test result file to .gitignore:
# Unity CLI test output
test-results*.xml
test-results*.json
Generated test reports are build artifacts, not source code. Commit the tests, not yesterday’s result file.
Step 5: create the GitHub secrets
A GitHub-hosted runner needs to activate Unity before it can run editor-backed work. Store those values as repository secrets, not plain workflow text.
Use these names in the workflow below:
UNITY_EMAIL
UNITY_PASSWORD
UNITY_SERIAL
In GitHub, add them under:
Repository → Settings → Secrets and variables → Actions → New repository secret
If you are using a paid Unity seat, pay attention to license seats. CI runners are machines too from the license server’s point of view. If a job activates a seat and never returns it, the next run may fail in a way that looks unrelated to the code change.
That is why the workflow below returns the license in an always() step. Boring cleanup is not optional here. It is the difference between useful automation and a tiny license leak machine.
Step 6: add the GitHub Actions workflow
Create this file:
.github/workflows/unity-edit-mode-tests.yml
Then start with one job:
name: Unity Edit Mode Tests

on:
  push:
    branches: ["main", "master"]
  pull_request:
    branches: ["main", "master"]
  workflow_dispatch:

env:
  UNITY_VERSION: "6000.0.0f1" # replace with your project version
  TEST_RESULTS_XML: test-results.xml
  TEST_RESULTS_JSON: test-results.json

jobs:
  edit-mode-tests:
    name: Edit Mode Tests
    runs-on: ubuntu-latest
    timeout-minutes: 30

    steps:
      - name: Check out repository
        uses: actions/checkout@v6

      - name: Install Unity CLI
        shell: bash
        run: |
          set -euo pipefail
          curl -fsSL "https://services.api.unity.com/unity/editor/v1/download/cli/linux" | bash
          unity --version

      - name: Install Unity Editor
        shell: bash
        run: |
          set -euo pipefail
          unity install \
            --version "$UNITY_VERSION" \
            --yes \
            --accept-license

      - name: Activate Unity license
        shell: bash
        run: |
          set -euo pipefail
          EDITOR_PATH="$(unity editors --installed --json \
            | python3 -c 'import json,sys; data=json.load(sys.stdin); print(data[0]["path"])')"

          "$EDITOR_PATH/Editor/Unity" \
            -batchmode \
            -nographics \
            -quit \
            -serial "${{ secrets.UNITY_SERIAL }}" \
            -username "${{ secrets.UNITY_EMAIL }}" \
            -password "${{ secrets.UNITY_PASSWORD }}"

      - name: Run Edit Mode tests
        shell: bash
        run: |
          set -euo pipefail
          unity test \
            --project-path . \
            --editor-version "$UNITY_VERSION" \
            --test-platform editmode \
            --results-path "$TEST_RESULTS_XML" \
            --results-format xml \
            --allow-install \
            --timeout 600 \
            --no-graphics

          unity test \
            --project-path . \
            --editor-version "$UNITY_VERSION" \
            --test-platform editmode \
            --results-path "$TEST_RESULTS_JSON" \
            --results-format json \
            --allow-install \
            --timeout 600 \
            --no-graphics

      - name: Upload test results
        if: always()
        uses: actions/upload-artifact@v4
        with:
          name: unity-edit-mode-test-results
          path: |
            ${{ env.TEST_RESULTS_XML }}
            ${{ env.TEST_RESULTS_JSON }}
          if-no-files-found: warn

      - name: Return Unity license
        if: always()
        shell: bash
        run: |
          set -euo pipefail
          EDITOR_PATH="$(unity editors --installed --json \
            | python3 -c 'import json,sys; data=json.load(sys.stdin); print(data[0]["path"])')"

          "$EDITOR_PATH/Editor/Unity" \
            -batchmode \
            -nographics \
            -quit \
            -returnlicense \
            -username "${{ secrets.UNITY_EMAIL }}" \
            -password "${{ secrets.UNITY_PASSWORD }}"
I keep this as one file and one job on purpose. No reusable actions. No custom Docker image. No cache. No matrix. Not yet.
The first version of a CI workflow should be boring enough that anyone on the project can read it. Once it works, then optimize.
The important parts of the workflow
The trigger block runs on pushes and pull requests to main or master:
on:
  push:
    branches: ["main", "master"]
  pull_request:
    branches: ["main", "master"]
  workflow_dispatch:
workflow_dispatch is worth keeping. It gives you a manual “run this again” button in GitHub Actions. It helps when debugging runner issues without creating junk commits.
The env block keeps the repeated strings in one place:
env:
  UNITY_VERSION: "6000.0.0f1"
  TEST_RESULTS_XML: test-results.xml
  TEST_RESULTS_JSON: test-results.json
This only removes the easiest typo source. If the version appears five times, someone will update four of them.
The checkout step is standard GitHub Actions plumbing:
- name: Check out repository
  uses: actions/checkout@v6
Without it, the runner has an empty workspace. Obvious, yes, and still easy to forget when writing the first workflow by hand.
The Unity CLI install step is the cloud equivalent of installing it locally:
- name: Install Unity CLI
  shell: bash
  run: |
    set -euo pipefail
    curl -fsSL "https://services.api.unity.com/unity/editor/v1/download/cli/linux" | bash
    unity --version
If Unity changes the install URL, use the current URL from the official docs. The rest of the workflow should still hold its shape.
The editor install step pins the editor version:
unity install \
  --version "$UNITY_VERSION" \
  --yes \
  --accept-license
This can be slow on a cold runner, and that is fine for a first pass. If it becomes painful, the next lazy improvement is caching or a custom runner image, not rewriting the whole pipeline.
The test step runs exactly the kind of command we already ran locally:
unity test \
  --project-path . \
  --editor-version "$UNITY_VERSION" \
  --test-platform editmode \
  --results-path "$TEST_RESULTS_XML" \
  --results-format xml \
  --allow-install \
  --timeout 600 \
  --no-graphics
I want that mirroring. Local and CI should not feel like two separate worlds. If CI fails, you want a developer to copy the command, run it locally, and reproduce the problem.
A useful second test: protect a real rule
Once the smoke test passes in CI, delete it or leave it alone and add one test that protects real game behavior.
Here is a small inventory example. It is still pure C#, so it belongs in Edit Mode tests:
namespace Game.Inventory
{
    public sealed class InventorySlot
    {
        public string ItemId { get; private set; } = "";
        public int Count { get; private set; }
        public int Capacity { get; }

        public InventorySlot(int capacity)
        {
            Capacity = capacity > 0 ? capacity : 1;
        }

        public int Add(string itemId, int amount)
        {
            if (string.IsNullOrWhiteSpace(itemId) || amount <= 0)
                return amount;

            if (Count > 0 && ItemId != itemId)
                return amount;

            ItemId = itemId;

            var accepted = System.Math.Min(amount, Capacity - Count);
            Count += accepted;
            return amount - accepted;
        }
    }
}
And the tests:
using Game.Inventory;
using NUnit.Framework;

namespace Game.Tests
{
    public sealed class InventorySlotTests
    {
        [Test]
        public void Add_fills_empty_slot_and_returns_leftovers()
        {
            var slot = new InventorySlot(capacity: 10);

            var leftover = slot.Add("potion", amount: 14);

            Assert.AreEqual("potion", slot.ItemId);
            Assert.AreEqual(10, slot.Count);
            Assert.AreEqual(4, leftover);
        }

        [Test]
        public void Add_rejects_different_item_when_slot_is_occupied()
        {
            var slot = new InventorySlot(capacity: 10);
            slot.Add("potion", amount: 3);

            var leftover = slot.Add("bomb", amount: 2);

            Assert.AreEqual("potion", slot.ItemId);
            Assert.AreEqual(3, slot.Count);
            Assert.AreEqual(2, leftover);
        }
    }
}
For the first pipeline, this beats a scene-heavy integration test. It runs quickly, it fails clearly, and it protects an actual rule. If someone changes stacking behavior, the failure points at the rule instead of giving you a vague “player prefab did not initialize” problem.
Common mistakes worth avoiding
The first mistake is checking in generated test results. Test output belongs in artifacts. Source control should hold tests and workflow files.
The second mistake is hiding the Unity version. Put it in the workflow env block, and ideally mirror it in project documentation. Better yet, keep a tiny ci/unity-version.txt file and have both scripts read it. I treat that as a follow-up once the basic workflow is stable.
The third mistake is not returning the license. The cleanup step should use if: always() because failures are exactly when cleanup gets skipped by accident.
The fourth mistake is starting with a full build matrix. Android, Windows, macOS, WebGL, Play Mode tests, asset validation, package publishing — all useful eventually. None belong on day one. One passing Edit Mode job is better than a giant workflow nobody trusts.
The fifth mistake is making CI-only commands. If a developer cannot run the same test command locally, debugging gets slower. Keep the local and cloud commands as similar as possible.
Where I would take it next
After Edit Mode tests are stable, I would add one improvement at a time.
First, split local commands into scripts:
scripts/test-editmode.sh
scripts/install-unity-editor.sh
Then call those scripts from GitHub Actions. That keeps the workflow short and gives developers the same entry points locally.
Second, add Play Mode tests only for systems that genuinely need engine behavior. Do not move pure logic into Play Mode tests just because it lives in a Unity project.
Third, add a build job on release branches:
unity build --help
Start by reading the CLI help for your installed version, then create one build target. Do not build every platform until one platform is boring.
Fourth, parse the XML or JSON results into a small summary. Artifact upload is enough at first, but a readable failure summary in the GitHub Actions log saves time once the test suite grows.
The rule I keep
Unity CI does not have to start as a complicated build farm.
Start with one command that runs one Edit Mode test suite. Run it locally. Put the same shape into GitHub Actions. Upload the result. Return the license. Keep the workflow boring until boring stops being enough.
That gives the project a real safety rail without asking the whole team to become infrastructure specialists. And once that rail exists, every small pure-code test you add gets checked automatically on every push.
I like that kind of automation because it is small, visible, and annoying enough to catch mistakes before players do.